커넥션 풀이란 db와 연결하는 커넥션을 미리 생성해두고 풀에 저장해두었다 필요할때 꺼내쓰고, 사용후에는 다시 풀에 반환하는 기법을 말한다.
(멀티쓰레드의 쓰레드풀과 유사하다.)
커넥션을 미리 생성해두기 때문에 커넥션을 사용자가 db를 사용할때마다 매번 생성을 하는것보다 더 빠른 속도를 보장한다.
또한 커넥션의 최대 생성 갯수도 제어해주기 때문에 많은 사용자가 몰려도 과부화를 방지할 수 있다.


커넥션 풀의 오픈소스에는 대표적으로 DBCP와 C3P0이 있는데 여기선 DBCP를 사용하였다. DBCP는 아파치 사이트에서 받을수 있는데, 그 외에 DBCP에서 사용한 Pool인 Commons Pool이 필요하고, 부가적으로 로그 기록에 사용되는 Commons Logging도 필요하다.
각각의 API는 아래 링크에서 받을 수 있다.


1. DBCPInit.java
package jdbc;

import java.sql.DriverManager;
import java.util.Properties;

import javax.servlet.ServletException;
import javax.servlet.http.HttpServlet;

import org.apache.commons.dbcp2.ConnectionFactory;
import org.apache.commons.dbcp2.DriverManagerConnectionFactory;
import org.apache.commons.dbcp2.PoolableConnection;
import org.apache.commons.dbcp2.PoolableConnectionFactory;
import org.apache.commons.dbcp2.PoolingDriver;
import org.apache.commons.pool2.impl.GenericObjectPool;
import org.apache.commons.pool2.impl.GenericObjectPoolConfig;

public class DBCPInit extends HttpServlet {

    @Override
    public void init() throws ServletException {
            loadJDBCDriver();
            initConnectionPool();
    }
    private void loadJDBCDriver() {
        try {
            //커넥션 풀에서 사용할 jdbc 드라이버를 로딩
            Class.forName("com.mysql.jdbc.Driver");
        } catch (ClassNotFoundException ex) {
            throw new RuntimeException("fail to load JDBC Driver", ex);
        }
    }
    private void initConnectionPool() {
        try {
            String jdbcUrl = "jdbc:mysql://localhost:3306/chap14?" + "useUnicode=true&characterEncoding=utf8";
            String username = "phs1116";
            String pw = "1234";
            
            //커넥션팩토리 생성. 커넥션 팩토리는 새로운 커넥션을 생성할때 사용한다.
            ConnectionFactory connFactory = new DriverManagerConnectionFactory(jdbcUrl, username, pw);
            
            //DBCP가 커넥션 풀에 커넥션을 보관할때 사용하는 PoolableConnectionFactory 생성
            //실제로 내부적으로 커넥션을 담고있고 커넥션을 관리하는데 기능을 제공한다. ex)커넥션을 close하면 종료하지 않고 커넥션 풀에 반환
            PoolableConnectionFactory poolableConnFactory = new PoolableConnectionFactory(connFactory, null);
            //커넥션이 유효한지 확인할때 사용하는 쿼리를 설정한다.
            poolableConnFactory.setValidationQuery("select 1");
            
            
            //커넥션 풀의 설정 정보를 생성한다.
            GenericObjectPoolConfig poolConfig = new GenericObjectPoolConfig();
            //유휴 커넥션 검사 주기
            poolConfig.setTimeBetweenEvictionRunsMillis(1000L * 60L * 1L);
            //풀에 있는 커넥션이 유효한지 검사 유무 설정
            poolConfig.setTestWhileIdle(true);
            //커넥션 최소갯수 설정
            poolConfig.setMinIdle(4);
            //커넥션 최대 갯수 설정
            poolConfig.setMaxTotal(50);

            //커넥션 풀 생성. 인자로는 위에서 생성한  PoolabeConnectionFactory와 GenericObjectPoolConfig를 사용한다.
            GenericObjectPool<PoolableConnection> connectionPool = new GenericObjectPool<>(poolableConnFactory,
                    poolConfig);
            
            //PoolabeConnectionFactory에도 커넥션 풀을 연결
            poolableConnFactory.setPool(connectionPool);
            
            //커넥션 풀을 제공하는 jdbc 드라이버를 등록.
            Class.forName("org.apache.commons.dbcp2.PoolingDriver");
            
 
            PoolingDriver driver = (PoolingDriver) DriverManager.getDriver("jdbc:apache:commons:dbcp:");
            //위에서 커넥션 풀 드라이버에 생성한 커넥션 풀을 등룍한다. 이름은 cp이다.
            driver.registerPool("cp", connectionPool);
        } catch (Exception e) {
            throw new RuntimeException(e);
        }
    }
}


2. web.xml에 서블릿 실행 설정
    <servlet>
        <servlet-name>DBCPInit</servlet-name>
        <servlet-class>jdbc.DBCPInit</servlet-class>
        <load-on-startup>1</load-on-startup>
    </servlet>


3. 커넥션 사

String jdbcDriver = "jdbc:apache:commons:dbcp:cp";
...
conn = DriverManager.getConnection(jdbcDriver);

커넥션을 사용할땐 기존 db 주소가 아닌 커넥션 풀의 주소를 사용한다.


'JAVA > JSP,Servlet' 카테고리의 다른 글

JSP 모델1과 모델2, 그리고 MVC 패턴  (2) 2016.02.15

this 키워드는 자바스크립트와 다른 클래스 기반 언어와는 약간 다른개념이다.
C++에서 this라함은 보통 이를 사용하는 멤버함수가 속한 클래스를 가르키는 포인터이고, java또한 비슷한 기능을 가진다.
이렇게 클래스 기반언어 C++/JAVA의 this는 기능이 정해져있다.

자바스크립트 또한 클래스기반 언어 처럼 같은 기능을 제공하지만, this 키워드를 사용하는 방법에 따라 가르키는 대상이 모두 다르다.


자바에서의 this

class Memeber{
    private String id;
    private String password;
    
    Memeber{String id, String password){
        this.id = id;
        this.password = password;
    }
}

C++에서의 this

class Brick{
private:
    int shape;
    int rot;
public:
    Brick(){
    srand(GetTickCount());
    this->shape = rand() % 6; 
    this->rot = rand() % 3; 
    }
};  


'This'

자바스크립트에서 this가 가르키는 경우는 크게 5가지의 경우로 나타낼 수 있다.

1. Global Scope에서 사용될 때 this는 전역 객체를 가르킨다(window 객체)

2. 함수에서 사용될 때에도 this는 전역 객체를 가르킨다.(window 객체)

3. 객체에 속한 메서드에서 사용될 때 this는 메서드가 속한 객체를 가르킨다.

4. 객체에 속한 메서드의 내부함수에서 사용될 때 this는 전역 객체를 가르킨다.(window 객체)

5. 생성자에서 사용될 때, this는 이 생성자로 인해 생성된 새로운 객체를 가르킨다.


이렇게 정리해놓고 보니, 4번의 경우를 제외하고 this도 일반적으로 자기가 속한 객체를 가르키는것으로 알 수 있다.


1. Global Scope에서 사용될 때 this는 전역 객체를 가르킨다(window 객체)

var func = {}; //객체 생성

this === window;//true

this === func;//false

다음과 같이 global scope에서 this와 전역객체를 비교해보면 true를 반환한다. global scope 자체가 전역객체(window)이므로  전역변수들과 함수들은 모두 전역객체에 속한다.


2. 함수에서 사용될 때에도 this는 전역 객체를 가르킨다.(window 객체)

function func(){
    if(this===window)
        console.log("this===window");
}

func();

1번과 같은 맥락으로 global scope가 전역객체이므로 함수는 전역객체에 속하는 메서드와 같다. this는 자신이 속한 메서드를 가르키므로 함수의 this는 window를 가르킨다. 따라서 이 코드의 함수 내 if문은 올바르게 작동하여 "this===window"를 출력한다.


3. 객체에 속한 메서드에서 사용될 때 this는 메서드를 호출한 객체를 가르킨다.

var obj = { func : function(){ if(this===window){ console.log("this===window"); } else if(this===obj){ console.log("this===obj"); } } } object.func();

메서드를 하나 가지고있는 객체를 생성했다. 이 객체의 메서드 func는, this가 window일때와 obj일때에 따라 다른 결과를 출력한다.

코드를 실행해보면 this===obj가 출력된다. 따라서 객체에 메서드가 사용하는 this는 자신이 속한 객체를 가리킴을 알 수 있다.


4. 객체에 속한 메서드의 내부함수에서 사용될 때 this는 전역 객체를 가르킨다.(window 객체)

var obj = { func : function(){ function inner(){ if(this===window){ console.log("this===window"); } else if(this===obj){ console.log("this===obj"); } } inner(); } } obj.func();


3번의 코드에서 메서드에 내부함수를 추가하고 그 안에 this가 어떤 객체에 속하는지 확인하는 코드를 넣었다. 이코드의 결과로는 놀랍게도 "this===window"가 출력된다. 따라서 내부함수에서 this를 사용할때에는 주의를 요한다.
내부함수에서 자신이 속한 객체를 가르키는 this 키워드가 필요할 시 보통은 다음과 같이 메서드 내에서 this를 변수에 따로 저장하여 그 변수를 사용하는 방법을 취한다.


var obj = { func : function(){ var that = this; function inner(){ if(that===window){ console.log("that===window"); } else if(that===obj){ console.log("that===obj"); } } inner(); } } obj.func();

위 코드는 "that===obj"가 출력된다.위 방법 외에 아래와 같이 bind 메서드를 사용해서 같은 결과를 출력할 수 있다. 밑의 코드는 "this===obj"를 출력한다

var obj = {
    func : function(){
        var inner = function(){
            if(this===window){
                console.log("this===window");
            }
            else if(this===obj){
                console.log("this===obj");
            }
        }.bind(this);
        inner();
    }
}

obj.func()


5. 생성자에서 사용될 때, this는 이 생성자로 인해 생성된 새로운 객체를 가르킨다.

function obj(){ this.thisValue = this; this.func = function(){ if(this===window){ console.log("this===window"); } else if(this===obj){ console.log("this===obj"); } else{ console.log("this===other Object"); } } } var A = new obj(); A.func();

이는 일반적인 this 사용과 같다. 위 생성자의 프로퍼티로 들어있는 func메서드는 this가 어떤 값인지를 출력한다. 새로운 객체를 생성하고 위 메서드를 실행해보면,"this===other Object"가 출력된다. 즉 여기서 this는 window도, obj아닌 새로운 값을 가진다는 것을 알 수 있다.
이 this는 새롭게 생성된 객체 A를 가르키는지 확인을 위해 다음 코드를 입력해보자.

A.thisValue === A

여기서 thisValue 프로퍼티는 this의 값을 저장하고 있다. 위 코드를 입력하면 true를 반환하는데, 이를 통해 생성자의 this는 새로운 객체를 생성할 시 그 객체(여기서는 객체 A)를 가르킴을 확인할 수 있다.


apply 메서드와 call 메서드로 this 제어

this는 이렇게 어디서 사용되냐에 따라 참조하는 값이 다르다. 근데 function.prototype의 apply 메서드와 call 메서드를 이용해서 이 this 키워드를 제어할수 있다. 즉 위에 정해진 5가지 경우와 다르게 다른 값을 참조하도록 만들어줄 수 있다.

apply와 call은 인자값만 조금 다르고, 결과는 모두 같으므로 apply로만 예제를 보도록 하겠다.

var obj = {};
function func(){
    if(this===window)   
        console.log("this===window");
    else if(this===obj)
        console.log("this===obj");
    }
    
func();
func.apply(obj);

기본적으로 함수 func는 grobal scope에 존재하므로 this는 전역객체(window)를 가르킨다. 따라서 func를 실행하면 "this===window"가 출력된다.

하지만 apply로 인자값에 obj를 전달하여 func.apply(obj)를 실행하면 "this===obj"가 출력된다. 즉 apply를 통해 저 함수의 this값을 obj로 변경하여 함수가 실행되었다.

apply는 인자로 바인딩할 객체와, 해당 함수에 전달할 인자들을 '배열'로 입력받는다. 반면 call은 배열이 아닌 인자들도 입력받는다는 점이 다르니 이는 입맛이나 때에 따라 사용하자.

ex) func.apply(obj,[a,b,c]);    func.apply(obj,a,b,c);


접근제어자 public으로써의 this 

자바스크립트에서는 C++과 JAVA와 같이 public이나 private같은 접근제어자가 따로 존재하지 않는다. 하지만 var,this로 객체를 캡슐화 할 수 있다.

function Member(id,password){
    this.id = id;
    var pass = password;
    this.getPassword = function(){
        return pass;
    }
}

var newUser = new Member("hsp1116","12345");

console.log(newUser.id);
console.log(newUser.pass);
console.log(newUser.getPassword());

위 코드를 실행해보면 console.log(newUser.id)는 올바르게 id를 출력하지만 console.log(newUser.pass)는 undefiend가 출력된다. this.id는 노출되지만 var.pass는 은닉화 된것이다.
대신 getter메서드인 console.log(newUser.getPassword())는 올바르게 출력되는것을 확인할 수 있다.


//적용 방법 1

JLayeredPane layered1 = new

JLayeredPane(); jframe.add(layered1);

//적용 방법 2

JLayeredPane layered2 = this.getLayeredPane(); //컴퍼넌트 추가방법중 하나 layered.add(Compnent comp, int index);


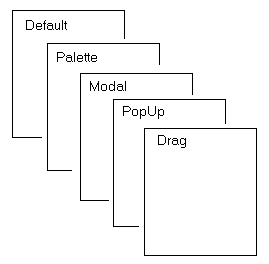
JLayeredPane는 JFC나 Swing의 컨테이너에 깊이(depth)를 적용하여 컨테이너들을 겹쳐서 사용할 수 있도록 하는 컨테이너 객체이다.


add 메서드의 매개변수중 index의 크기에 따라서 깊이가 달라지는데, 크기가 클수록 더욱 상위에 위치한다.


JLayeredPane 클래스에는 이를 위해 몇가지 static final integer값이 선언되어있다.


 DEFAULT_LAYER

 new Integer(0)

 PALETTE_LAYER 

 new Integer(100)

 MODAL_LAYER

 new Integer(200)

 POPUP_LAYER

 new Integer(300)

 DRAG_LAYER

 new Integer(400)


자세한 깊이 정도는 위의 그림 참조.


http://docs.oracle.com/javase/8/docs/api/javax/swing/JLayeredPane.html


Method NameDescription
showConfirmDialogAsks a confirming question, like yes/no/cancel.
showInputDialogPrompt for some input.
showMessageDialogTell the user about something that has happened.
showOptionDialogThe Grand Unification of the above three.

//메세지 다이얼로그

JOptionPane.showMessageDialog(parentComponent, message);

JOptionPane.showMessageDialog(parentComponent, message, title, messageType);

JOptionPane.showMessageDialog(parentComponent, message, title, messageType, icon);


JDialog를 이용해서 다이얼로그를 생성할 수 있지만


JOptionPane를 이용하면 제한적인 기능을 가진 다이얼로그를 간단하게 생성 할 수 있다.


JOptionPane.showMessageDialog(null, "ID,비밀번호를  모두 입력해주세요.");


http://docs.oracle.com/javase/6/docs/api/javax/swing/JOptionPane.html


loginButton = new JButton(new ImageIcon("img/btLogin_hud.png")); // 버튼 배경 이미지 설정

loginButton.setBorderPainted(false); // 버튼 테두리 설정

loginButton.setContentAreaFilled(false); // 버튼 영역 배경 표시 설정

loginButton.setFocusPainted(false); // 포커스 표시 설정


loginField.setBorder(javax.swing.BorderFactory.createEmptyBorder());//테두리 없애는 방법 1


passwordField = new JPasswordField(15){ //테두리 없애는 방법 2

public void setBorder(Border border){ } };


setBorder 메서드에 비어있는 border객체를 생성해 전달해주거나


setBorder 메서드를 비어둔 상태로 오버라이딩 해주면 된다.


+ Recent posts